
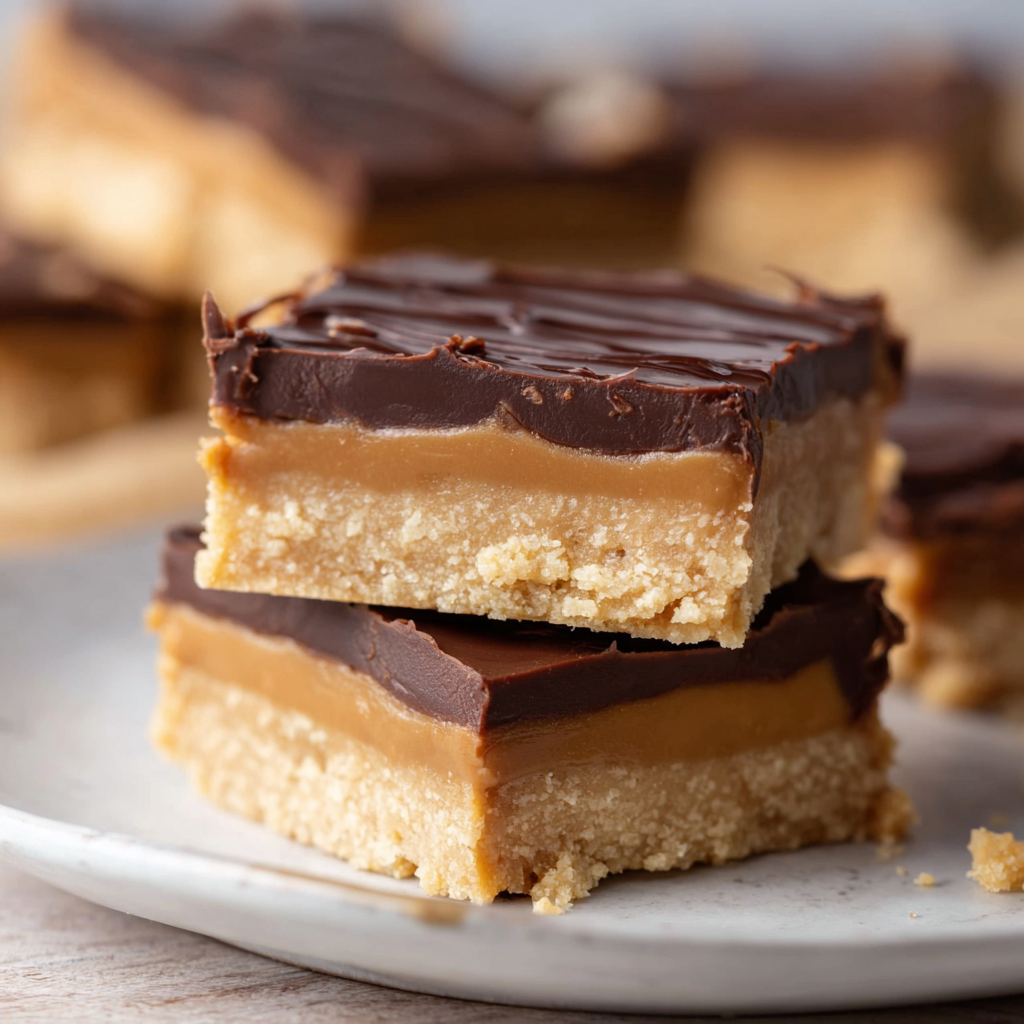
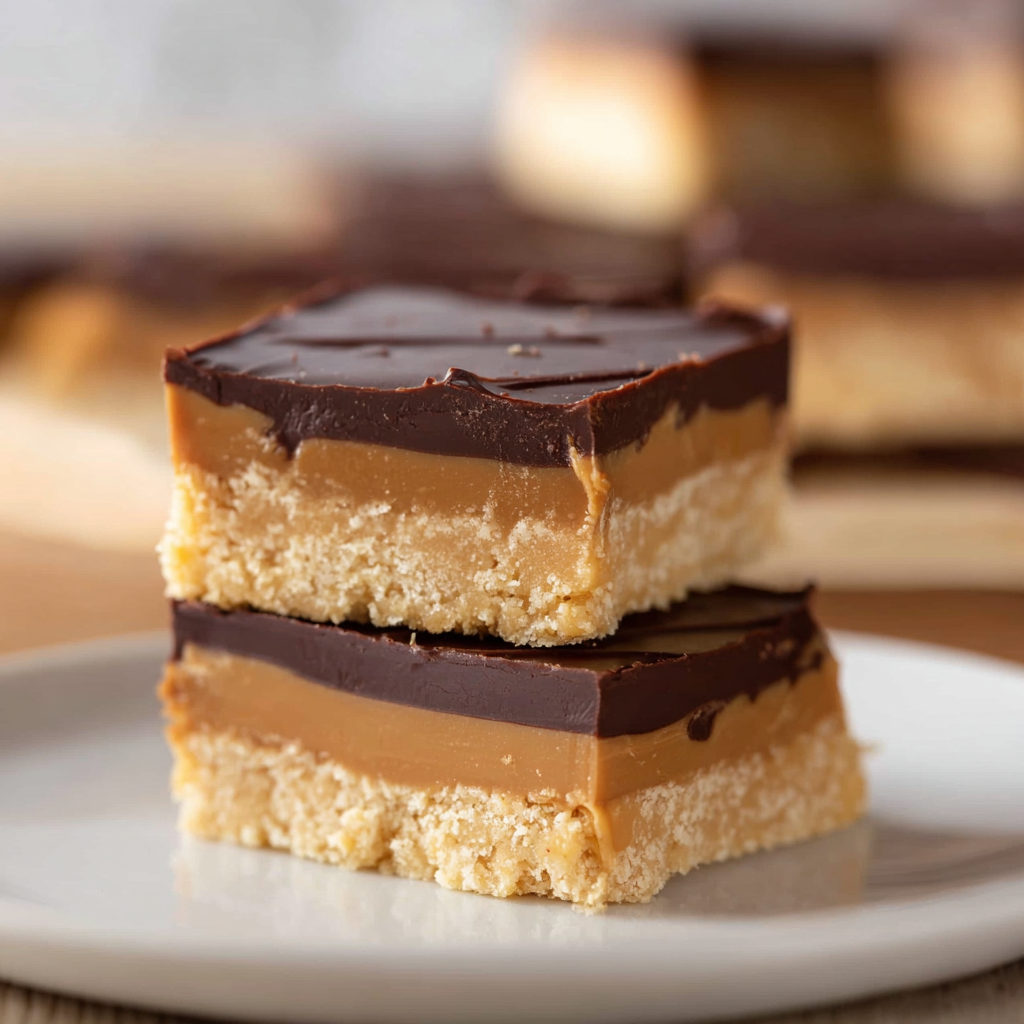
No Bake Buckeye Bars

Indulgent, creamy no-bake bars with a crunchy graham cracker and peanut butter base finished in smooth chocolate — perfect make-ahead squares for parties and potlucks.
Why You'll Love This Recipe
- Ready in about 10 minutes active time — the chilling is hands-off, making these ideal for busy hosts and last-minute desserts.
- Uses pantry staples: graham crackers, powdered sugar, peanut butter, butter and chocolate chips — no specialty baking ingredients required.
- Make-ahead friendly: assemble the day before or freeze for faster serving; stores well in the refrigerator for up to 5 days.
- Crowd-pleasing richness without complicated technique — no oven, no mixer, and the results look professional.
- Customizable: swap chocolate types or nut butters to suit dietary preferences and flavor profiles.
- Perfect yield: the 9x9 pan gives about 25 bite-sized squares — great for parties or portioning into snack boxes.
I first discovered this combination when I wanted a peanut-butter sweet that wasn’t a standard cookie. After a few tweaks — more powdered sugar for structure, a touch of extra butter for richness — my family declared these the new favorite. Neighbors often ask for the recipe, and I always tell them it’s the small details (how firmly you press the base, how smooth you melt the chocolate) that make the difference.
Ingredients
- Graham crackers: 2 cups of finely processed crumbs (about 14 full rectangle crackers or 28 squares). Choose classic honey or cinnamon graham crackers for extra flavor; pulse them in a food processor for an even texture.
- Butter: 1 cup (2 sticks) melted. Use unsalted for control over seasoning — if using salted, skip any additional salt. Melt gently and cool slightly before mixing to avoid melting the powdered sugar.
- Powdered sugar: 2 cups, sifted if lumpy. The powdered sugar provides structure and sweetness; use confectioners' sugar labeled 10X for best texture.
- Creamy peanut butter: 1 cup for the crust and 2 heaping tablespoons for the topping. Choose a smooth, well-stirred jar (Jif or Skippy work great); natural peanut butter can be used but may change texture and oil separation.
- Chocolate chips: 2 cups (semisweet recommended). For a richer top, use 60% cacao chips; for sweeter bars, milk chocolate chips are equally delicious. If you prefer, chop a bar of chocolate for a glossy melt.
Instructions
Line the pan: Line a 9x9-inch square pan with parchment paper, leaving a 1-2 inch overhang on two sides for easy removal. This keeps the bars intact when you lift them out to cut. Make crumbs: Pulse about 14 full graham crackers in a food processor until they resemble fine sand, about 10–15 short pulses. If you don’t have a processor, place crackers in a sealed bag and crush with a rolling pin — aim for uniform fines with a few slightly larger bits for texture. Combine base ingredients: In a large bowl, stir together 2 cups graham cracker crumbs, 1 cup melted butter, 2 cups powdered sugar, and 1 cup creamy peanut butter until fully incorporated. The mixture should hold together when pressed; if too dry, add a teaspoon of melted butter, one at a time. Press into pan: Transfer the peanut-butter crumb mixture into the prepared pan. Use the back of a measuring cup or a piece of parchment to press it down very firmly and evenly; this prevents crumbling when cut. Aim for an even 1/2-inch thickness. Melt the topping: In a microwave-safe bowl, combine 2 cups chocolate chips with 2 heaping tablespoons creamy peanut butter. Microwave in 30-second intervals, stirring thoroughly between each, until smooth and glossy. About 60–90 seconds total is typical; overheating can cause graininess. Top and chill: Pour the melted chocolate-peanut butter mixture over the pressed base and spread gently with a small offset spatula for an even layer. Refrigerate for at least 1 hour, or freeze 30 minutes for faster set-up. Slice and serve: Lift the set block from the pan using the parchment overhang. Use a sharp knife warmed under hot water and wiped dry to slice about 25 squares. Wiping the knife between cuts yields clean edges.
You Must Know
- Store refrigerated in an airtight container for up to 5 days; they hold their texture well because there’s no egg or cream to separate.
- Freeze wrapped tightly for up to 3 months — thaw in the refrigerator overnight before serving for best texture.
- Nutrition per square: roughly 263 kcal, 26 g carbs, 18 g fat, and 4 g protein — a rich treat best enjoyed in small portions.
- For neater slices warm the knife between cuts and press firmly when making the base to avoid crumbling.
What I love most about these squares is how reliably they impress with almost zero effort. At summer picnics I’ll prep them the night before, and they travel wonderfully when frozen solid; they arrive set and glossy. My kids appointed themselves the official quality control team and always give a thumbs-up — they call them “icebox peanut butter bars.” Making a double batch is my usual trick for holiday trays.
Storage Tips
Keep the squares refrigerated in a shallow airtight container with layers separated by parchment or wax paper to prevent sticking. At room temperature on a warm day the chocolate can soften quickly, so refrigeration is best for maintaining a clean slice. For longer storage, wrap the chilled block tightly in plastic wrap and foil, label with the date, and freeze for up to 3 months. To serve from frozen, transfer to the refrigerator for 8–12 hours to thaw slowly, or let sit at room temperature for 30–60 minutes for more immediate serving.
Ingredient Substitutions
Swap graham crackers for gluten-free graham-style crumbs or crushed gluten-free cookies to make these gluten-free — texture will be similar if the crumbs are finely ground. For a lower-sugar version, reduce powdered sugar slightly and add a touch more peanut butter for structure, or use a powdered sugar substitute labeled for one-to-one replacement. If you prefer a different nut flavor, sub almond butter or sunflower seed butter for a nut-free option; note that oil separation may require an extra tablespoon of powdered sugar to maintain firmness.
Serving Suggestions
Serve chilled squares on a platter dusted lightly with cocoa or with a sprinkling of flaky sea salt for contrast. They pair beautifully with strong coffee or a cold glass of milk. For a festive look, drizzle with white chocolate or add a sprinkle of toasted chopped peanuts. These are great bite-sized offerings at holiday parties; cut slightly smaller than 1.5-inch squares for cocktail-friendly portions, or plate with fresh berries to add a bright counterpoint to the rich flavors.
Cultural Background
These bars riff on the classic American buckeye candy — a peanut-butter center dipped in chocolate, named for the Ohio buckeye nut. The no-bake bar variation simplifies individual candies into a tray treat that retains the characteristic peanut-chocolate pairing. Variants of this concept appear across Midwestern potlucks and holiday tables, where no-bake sweets are prized for speed and crowd-pleasing flavor. They reflect the American tradition of pantry-based desserts — using staples like crackers, sugar, butter, and chocolate to produce comforting sweets.
Seasonal Adaptations
In summer, add a pinch of flaky sea salt and use dark chocolate for a sophisticated touch that balances sweetness. For winter holidays, fold a teaspoon of cinnamon or ginger into the base, or top with crushed peppermint candies just before the chocolate fully sets. Spring calls for lighter pairings: serve with tart fruit compote or lemon bars to cut through the richness. For autumn, swap in cinnamon graham crackers and top with a drizzle of caramel for an indulgent seasonal twist.
Meal Prep Tips
Make a double batch and portion into single-serve squares for lunchbox treats or grab-and-go snacks. Store wrapped squares in airtight containers so they stay fresh for up to a week in the fridge. If you’re packing them for a picnic, freeze the container overnight — by picnic time they’ll be perfectly chilled and transportable. Label containers with contents and date; frozen squares reheat poorly, so thaw fully before serving for best texture.
These squares have become a staple because they’re fast, forgiving, and endlessly adaptable. Whether you’re feeding a crowd or craving a quick sweet, they deliver consistent, crowd-pleasing results. Give them a try and make them your own — swap flavors, tweak textures, and share with friends.
Pro Tips
Press the peanut-butter crust very firmly into the pan for clean, non-crumbly slices.
Warm and wipe the knife between cuts to achieve neat squares with glossy chocolate edges.
If chocolate seizes, add 1 teaspoon neutral oil and stir off-heat to smooth it out.
This nourishing no bake buckeye bars recipe is sure to be a staple in your kitchen. Enjoy every moist, high protein slice — it is perfect for breakfast or as a wholesome snack any time.
Tags
No Bake Buckeye Bars
This No Bake Buckeye Bars recipe makes perfectly juicy, tender, and flavorful steak every time! Serve with potatoes and a side salad for an unforgettable dinner in under 30 minutes.
Ingredients
Base
Topping
Instructions
Prepare the pan
Line a 9x9-inch pan with parchment paper, leaving a 1–2 inch overhang for easy removal.
Process graham crackers
Pulse about 14 full graham crackers in a food processor until finely ground, or crush in a sealed bag with a rolling pin.
Combine base mixture
In a large bowl, mix 2 cups graham cracker crumbs, 1 cup melted butter, 2 cups powdered sugar, and 1 cup creamy peanut butter until a cohesive dough forms.
Press into pan
Press the mixture firmly and evenly into the lined pan using the bottom of a measuring cup or a sheet of parchment for smooth compaction.
Melt chocolate topping
In a microwave-safe bowl, combine 2 cups chocolate chips and 2 heaping tablespoons peanut butter; microwave in 30-second intervals, stirring until smooth and glossy.
Top and chill
Spread the melted chocolate over the pressed base, refrigerate at least 1 hour (or freeze 30 minutes), then lift out with parchment and slice into 25 squares.
Last Step: Please leave a rating and comment letting us know how you liked this recipe! This helps our business to thrive and continue providing free, high-quality recipes for you.
Nutrition
Did You Make This?
Leave a comment & rating below or tag
@kitchenfunwithmy3sons on social media!
Categories:
You might also like...
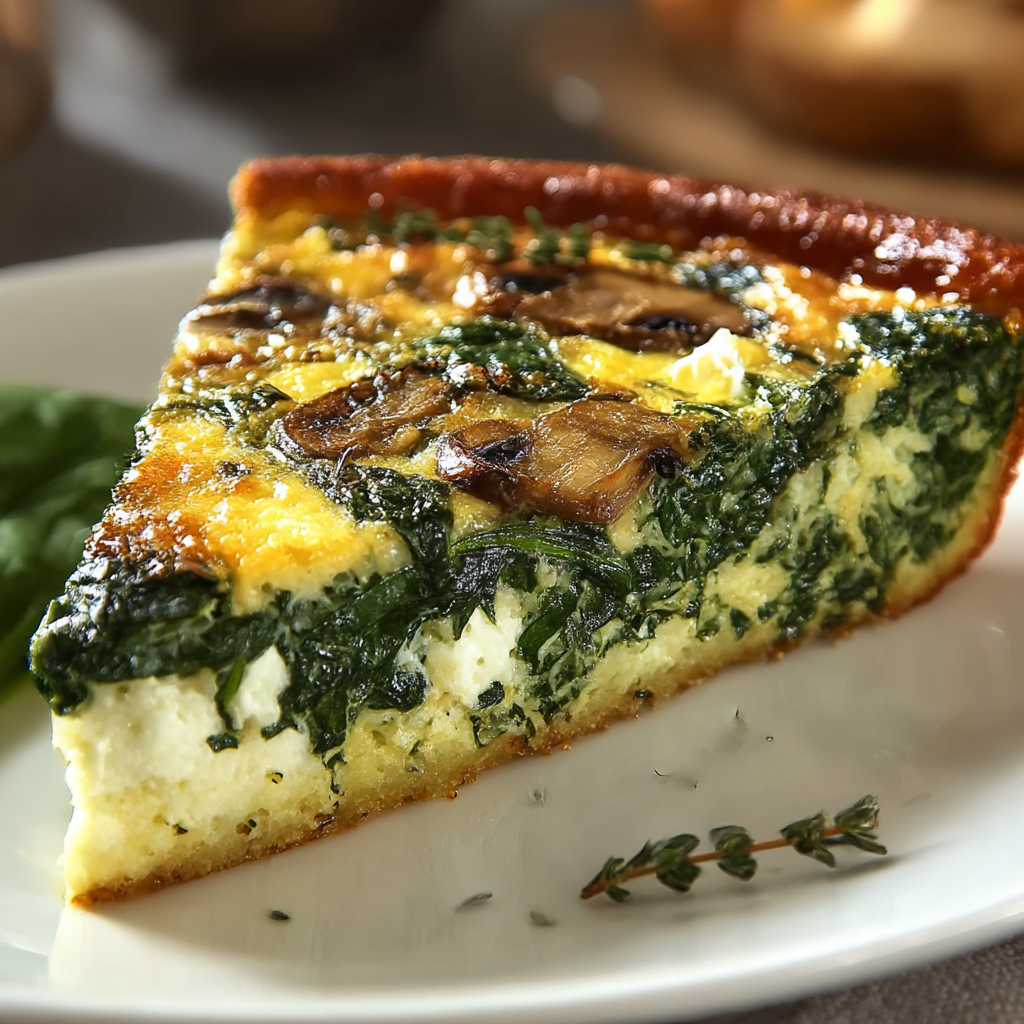
Easy Crustless Spinach Quiche
Fluffy crustless spinach quiche with cheddar and feta—an easy, gluten-free vegetarian brunch that comes together in under an hour.

Shrimp Crab Nacho Corn Dogs
Crunchy corn dogs filled with chopped shrimp, shredded crab, cheddar and a nacho-chip crust—an irresistible party snack that's crispy, savory and perfect for sharing.
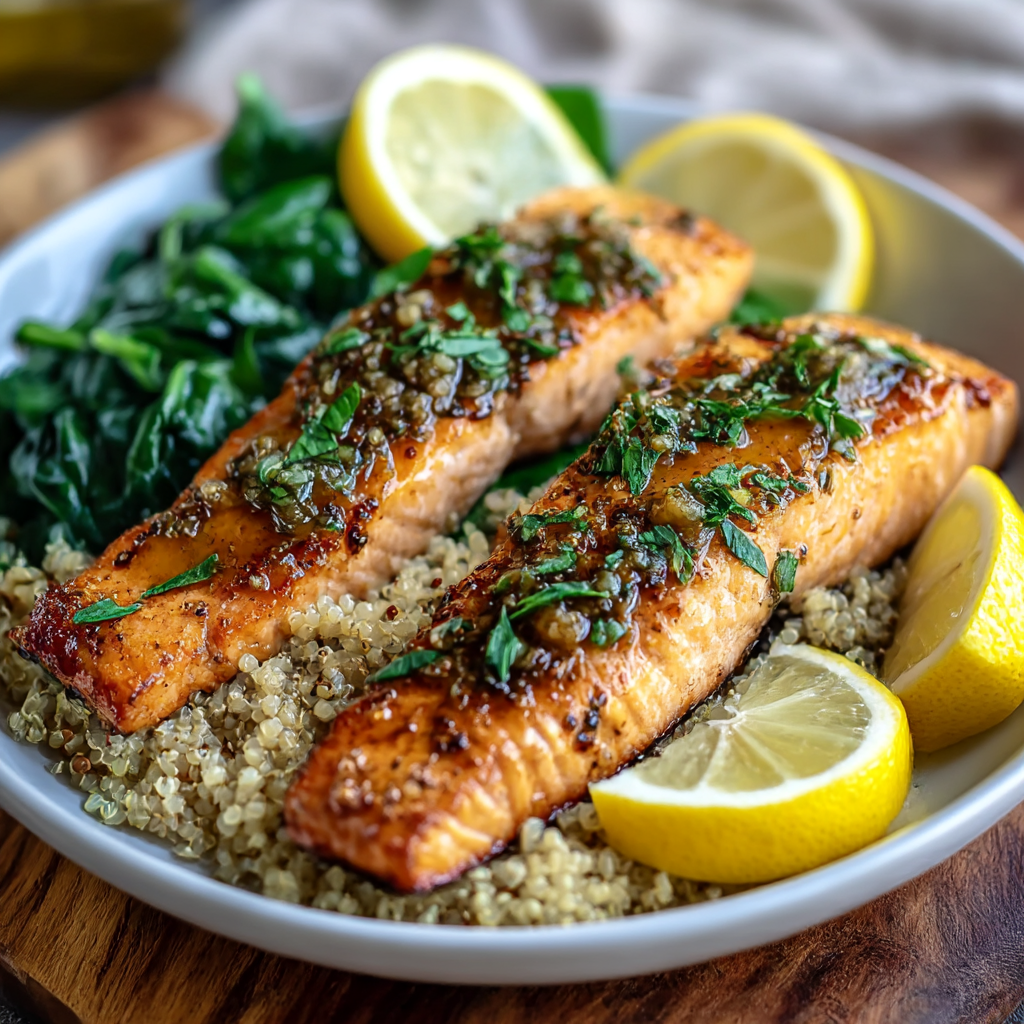
Lemon Herb Grilled Salmon Quinoa
Tangy grilled salmon served on a bed of quinoa and baby spinach with a lively lemon herb accent. A quick Mediterranean main that is gluten-free and dairy-free.
Did You Make This?
Leave a comment & rating below or tag @kitchenfunwithmysons on social media!
Rate This Recipe
Share This Recipe
Enjoyed this recipe? Share it with friends and family, and don't forget to leave a review!
Comments (1)
This recipe looks amazing! Can't wait to try it.
Comments are stored locally in your browser. Server comments are displayed alongside your local comments.
Hi, I'm Rachel!
What's Popular
Get My 30-Minute Meals email series!
Quick and easy dinner ideas delivered to your inbox.